Firebase is an application platform from Google which offers many useful services to get your mobile or web app project started up quickly. To authenticate your users, the Firebase Auth service offers registration screens and authorization functionalities. You can link Firebase Auth with a public sign-in provider (such as Google or Facebook log-in) but unfortunately Firebase auth does not support out-of-the-box integration with a custom OpenID Connect provider, which are often used to authenticate employees within an organization.
There are SaaS solutions out there such as Auth0 which can link your Identity Provider with Firebase, but they operate on a 5$/month/user price plan which can get rather expensive for your use case. In this guide I will elaborate how you can connect Firebase to Azure Active Directory yourself, based on the Azure AD OpenID Connect Guide. You can follow the same set-up to link to a different OpenId Connect Provider of your choice. This guide employs the OpenID Connect Implicit flow, more on that in the end. First, let’s get your web app hooked up to Azure AD.
Update: since publishing this article, Firebase has made Azure integration available. I haven’t tried it out myself, do let me know in the comments if it works well for your use case. In case it does not and you need to make some customization, follow straight ahead.
I’ve heard that the threat modeling approach helped users validate their authentication set-up.
The Authentication Flows
There are many guides out there which describe the OpenId Connect integration for a typical back-end application. Firebase is a bit different, as we’re dealing with three separate entities: the static front-end running in the browser, Firebase serverless functions (our stateless back-end) and the Firebase Service APIs. We’re going to create a serverless function which integrates with Azure AD and then provides a token which the front-end can use to authenticate with the Firebase API and access services like Firestore.
In my example I used a vue.js front-end application, you can follow the same approach for other frameworks such as React or Angular or just plain Javascript. The code is available at https://github.com/Alex-Wauters/firebase-auth-azure-ad
The basic steps for authenticating with a custom Identity Provider in Firebase are as follows:
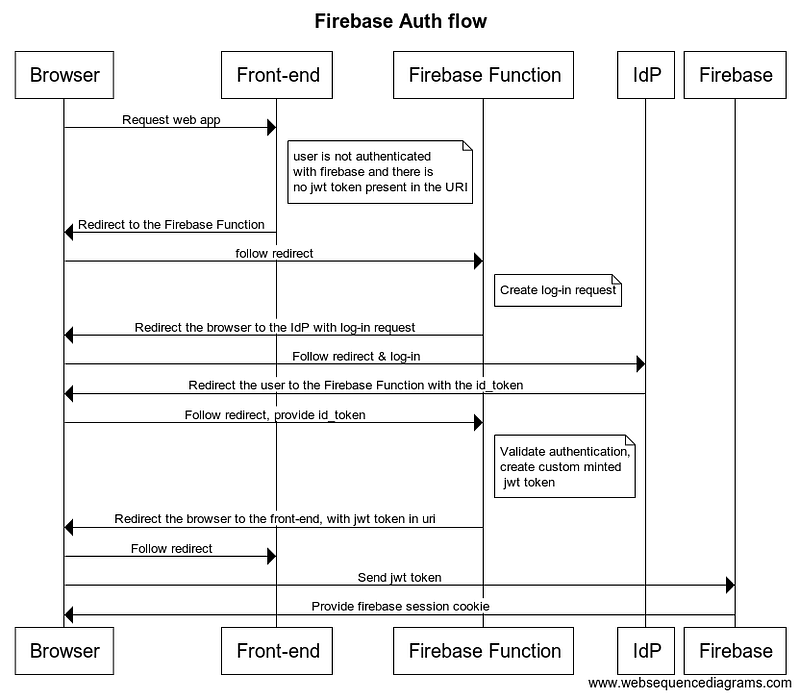
- Upon entering the front-end app, Firebase will validate whether the user is authenticated with the Firebase Auth service. If the user is not authenticated, the front-end app will attempt to retrieve a signed
jwttoken from the URI (browser’s location href). If there is no jwt token present, it means our Firebase Function has not yet authenticated the user and the front-end will redirect the browser to the validateAuth function. - The Firebase function receives the request, creates the authentication request and redirects the user to the Identity Provider along with the authentication request
- The Identity Provider validates the authentication request, requests the user to log-in, and subsequently redirects the user to a valid redirectUrl for the application.
- The user is redirected to another Firebase function which validates the authentication response. It checks if the response used a valid signature key, the signature and the right parameters (was the authentication response issued for your application?). If valid, the function mints a custom Firebase Auth token and redirects the user to the static front-end, with the token.
- The front-end reads the token and submits it to the Firebase Auth API, which responds with a session cookie. The user is now authenticated with Firebase.
Let’s go through each of these services in more detail
The Front-end
Code: https://github.com/Alex-Wauters/firebase-auth-azure-ad/blob/master/main.js
Redirect from the front-end to our auth function
In the front-end, you can use the Firebase SDK to verify whether the user is logged in. If they are not, we’ll check if a token from the authentication function is present. If so, we provide that custom minted token to the Firebase SDK and then proceed to load our single-page application.
If the user is not authenticated and no token is present, we redirect them to the auth function which we will create next.
The Serverless Functions Back-end
Code: https://github.com/Alex-Wauters/firebase-auth-azure-ad/blob/master/index.ts
The main authentication function
The authentication function should be accessible through its own hosting URL (see Firebase docs) and it’s what you will also need to configure in Azure AD as the redirectURI for your application.
The serverless function will be used for creating authentication requests as well as parsing the authentication response from Azure AD.
The authentication request is performed by redirecting the browser to
res.redirect(`https://login.microsoftonline.com/${tenantName}.onmicrosoft.com/oauth2/authorize?client_id=${clientId}&&response_type=id_token&scope=openid&nonce=42&response_mode=form_post`);
The nonce field is required for the Implicit Flow, but is set here to the exact same value each time. We’re not validating whether an authentication response from Azure AD has already been received in the past: I’ll elaborate on this and the security risks at the end of this article.
For an authentication response from Azure AD; we check if the token has the valid parameters set, retrieve the signature keys used by Azure AD and verify the signature of the token. If everything passes validation, we create a custom Firebase auth token which the front-end will use to authenticate with Firebase.
In the code example, you will need to provide the tenant id of your Azure AD environment, as well as the tenant name (the first part of XXXXX.onmicrosoft.com) and application id of your Azure AD Enterprise Application.
const issuerURI = “https://sts.windows.net/{TENANTID}/";
const tenantName = “yourtenantname”;
const clientId = “yourclientid”;
Validating the Signature with known keys
Azure AD publishes the signing keys it may use for signing authentication responses on its discovery endpoint which you should refresh at least daily.
You could request the signature keys whenever you validate an authentication response; but that would entail extra network traffic and a slower authentication flow. In my code example, I request the signature keys every day (through a pubsub tick) and update the keys in Firestore.
async function getSignatureKeys(): Promise<Array
return keys; // From container memory
}
keys = await getKeysFromDB();
if (keys.length !== 0) { // Will be empty the first time. return keys;
}
return await updateIdpKeys();
}
The function will first attempt to retrieve the keys from container memory. These will only be set when the container hosting the function is re-used for a new function invocation. It will be empty if the function was spun up in a new container.
The keys in the Firestore will be empty when the recurring update function has not been triggered yet. In that case, we’ll retrieve the keys from Azure’s https endpoint and update the keys in memory and Firestore. If you don’t want to create the Firestore and Scheduled Update function, you can leave out the getKeysFromDB() and skip the next step.
Refreshing the Identity Provider’s public keys
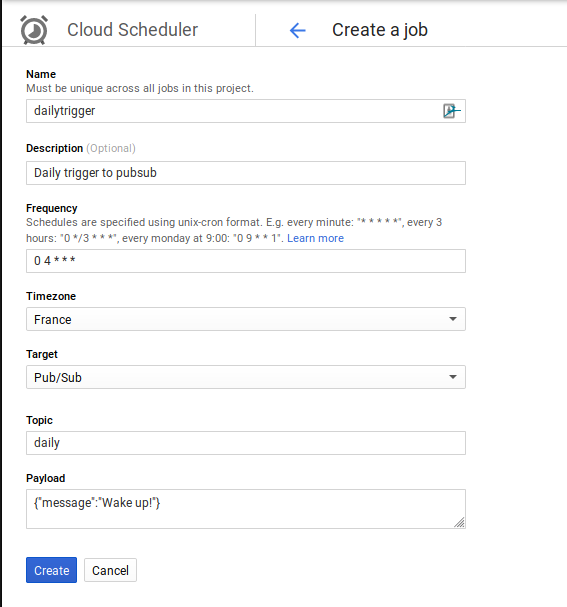
To periodically request the IdP public keys, we need to store the keys in Firestore and schedule a request to refresh the public credentials daily.
Go to pubsub in the Google Cloud console and create a topic and give it the name ‘daily’

Then go to Cloud Composer, and create a job which will trigger a message to this pubsub topic every day:
Excellent! Now to update our IdP validation functions:
These will store Azure AD’s keys in the IdpKeys collection. Make sure only your admin has the ability to write to /IdpKeys
And that’s it. To wire the front-end to the Firebase SDK we created a function which creates the authentication request, parses the authentication response and mints the custom authentication token.
Validating the authentication response means we need to verify that the signature used is one from Azure AD. Either we retrieve these on each call, or we cache the signing keys in Firestore and refresh these on a daily basis.
This implementation does carry some caveats which I’ll elaborate on next.
Security implications
The OpenId Connect Implicit Code flow means an authentication response from Azure AD is sent via the browser of the user (via the URI) to your function. The custom minted Firebase token is sent via the Firebase function to the front-end in the same way, through the jwt query parameter.
This means that whoever has access to the URL, can retrieve the authentication response and the jwt token and perform the exact same requests in order to authenticate themselves as the user (known as a replay attack). There are however the following mitigating factors in play:
- Firebase is https-only, which means network snoopers only see the hostname and not the request path of the URL
- Hosting of the front-end files and functions are on Firebase, which means the exact request paths are only available to those who have Stackdriver access. For other set-ups, you would typically validate that e.g. request logging does not log any security information such as the URL parameters.
- The Authentication response from Azure AD and the custom minted token are only valid for one hour
There are other OpenId Connect flows such as Authorization Code Grant which means only a one-time-use code are provided through the browser, and the back-end application has to retrieve the real access_token itself through a request to the Azure servers. They wouldn’t provide a benefit in this case, as long as we still need to transfer the Firebase token via the browser. A different option could be to set the token as a cookie, and read the token from the front-end. Considering the above mitigations, we were not concerned about replay attacks through users with access to the URL. This is also why the ‘nonce’ in the Authentication Request is set to a fixed value and not validated, to ensure the same authentication response is only handled once.
You should consider these security implications for your use case, and validate whether they are appropriate. A good methodology for security design and verification is Threat Modeling, which I elaborate on in this blog post.
In case you deem the none field appropriate for your use case, you could store created nonces in Firestore, and remove them once the authentication response has been validated.
That was it! Hope it was useful to you. If you have any questions or remarks, please drop a comment and let me know.